Notes from the first Product Foundry Program from the BRITE innovation project
Written in May and Jun 2022 by Shan Sun
Preamble - How and why did I start?
As a tax professional, product design seems to be a fanciful idea and irrelevant to our daily work. However, my experience in tax technology made me realise it is exactly the opposite - to modernise our tax process and systems, we need to have design thinking from the start.
A typical issue of tax technology project I encounter is lack of usage. For example, the users (tax operations) who use the tax technology product were not involved or consulted during a tax project (tax advisors); the project may be initiated from Finance or IT, the tax impact of which were only realised as an after-thought; or a lack of understanding of what is really being built, resulting in an inability to bridge the gap between expectations and the actual delivery.
Whatever the reason is, it is undeniable that we in tax technology need to consider product design principles as part our work. This is because fundamentally tax technology needs to serve an audience - internal/external customers or tax authorities. When designing tax technology, we must keep these people in mind
I came across the Product Foundry course purely by accident. At the beginning of 2022, I made a New Year’s Resolution to build something with my hands instead of just sitting around and typing at a computer. Stanford University has a franchised course called “How To Make (Almost) Anything” which is very popular among people who want to be makers. The only place I found that ran the six-month programme was in Brighton’s new establishment, Plus X, who sadly did not intend to run the programme in 2022.
However, I’m glad I found the space. Plus X is a government-supported initiative to regenerate coastal areas and encourage innovation in the UK. They have a fast prototyping workspace which consists of a heavy-duty woodwork lab, a digital lab (with 3D printers and laser cutters), a bio lab and a spray room. Everything was new and rather daunting to me. In the first 3 months, I was inducted onto 14 different machines that I had never dreamed of using before. Of course, there is a huge gap between knowing how something works (roughly) to actually using it to produce some good work! But regardless, I enjoyed the challenge.
The Plus X workshop manager Andrew told me they would start a condensed version of Stanford’s HTMAA course called “Product Foundry” in May, which I was hoped to secure a place on. In the interim, I also took a creative engineering course by Mark Rober (on monthly.com; now studio.com) - a former NASA engineer and engineering Vlogger who participated in designing the Curiosity Rover. This blog documents my experience in learning product design and prototyping at the Product Foundry course. It mainly serves as a memo to help me digest the content I learn during the course. Most of the words written here were produced on the train journeys between my home in London and the Plus X centre in Brighton.
Overall Course Structure
The Product Foundry course consists of seven face-to-face classroom-learning-style sessions, each lasting between 3-to-5 hours on Tuesdays. Occasionally, there are specific people working in various creative fields (design consulting, manufacturing, electronics, etc.) who come in to give a dedicated session if it is relevant to the audience.
Ten people were selected for the course. They have very different backgrounds, ranging from those with new, fresh ideas to people with completed or in-development products. I feel very lucky to be selected for the course, as my background in tax and finance differs vastly from the other students’ backgrounds in more practical development topics.
In the next six weeks, I’ve spent every minute of my spare time on this course to keep up with the pace. Broadly, my week is arranged as having theory/class on Tuesday morning, followed by questions (if any) with the in-house technicians or specialised field experts. My weekdays are spent on study, design, research, and putting the things I have learned into practice. Mostly my weekends are in the lab, using the machinery to develop my product (eg. 3D printers, laser cutters and CNC machines).
A roundup of us - the first cohort is published by Plus X, the host here.
Week 1 - Introduction to Design Concept
The first class of the Product Foundry course focused on the modern design innovation process. My knowledge of design and innovation theories are mainly learned on the job. It is therefore useful for me to learn the systematic approach of a design innovation framework. We were introduced to the so-called “Double Diamonds” diagram of design principles.
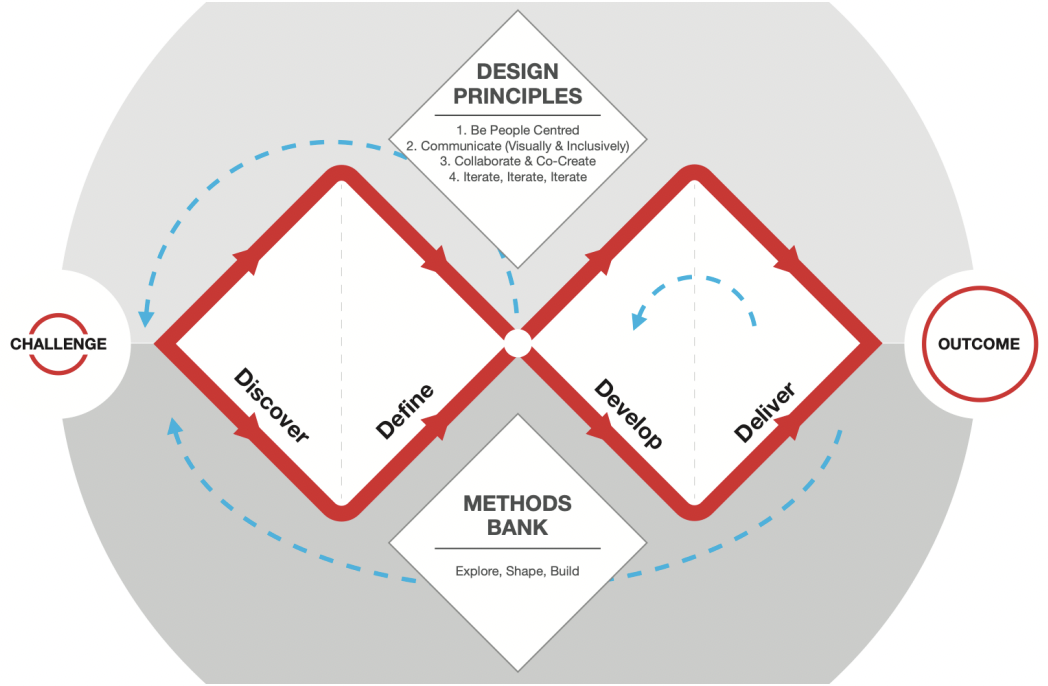
Source: https://www.designcouncil.org.uk/our-work/news-opinion/
The theory was written in detail in a Fixperts’ GitBook. A more detailed diagram shows the steps in each design phase:
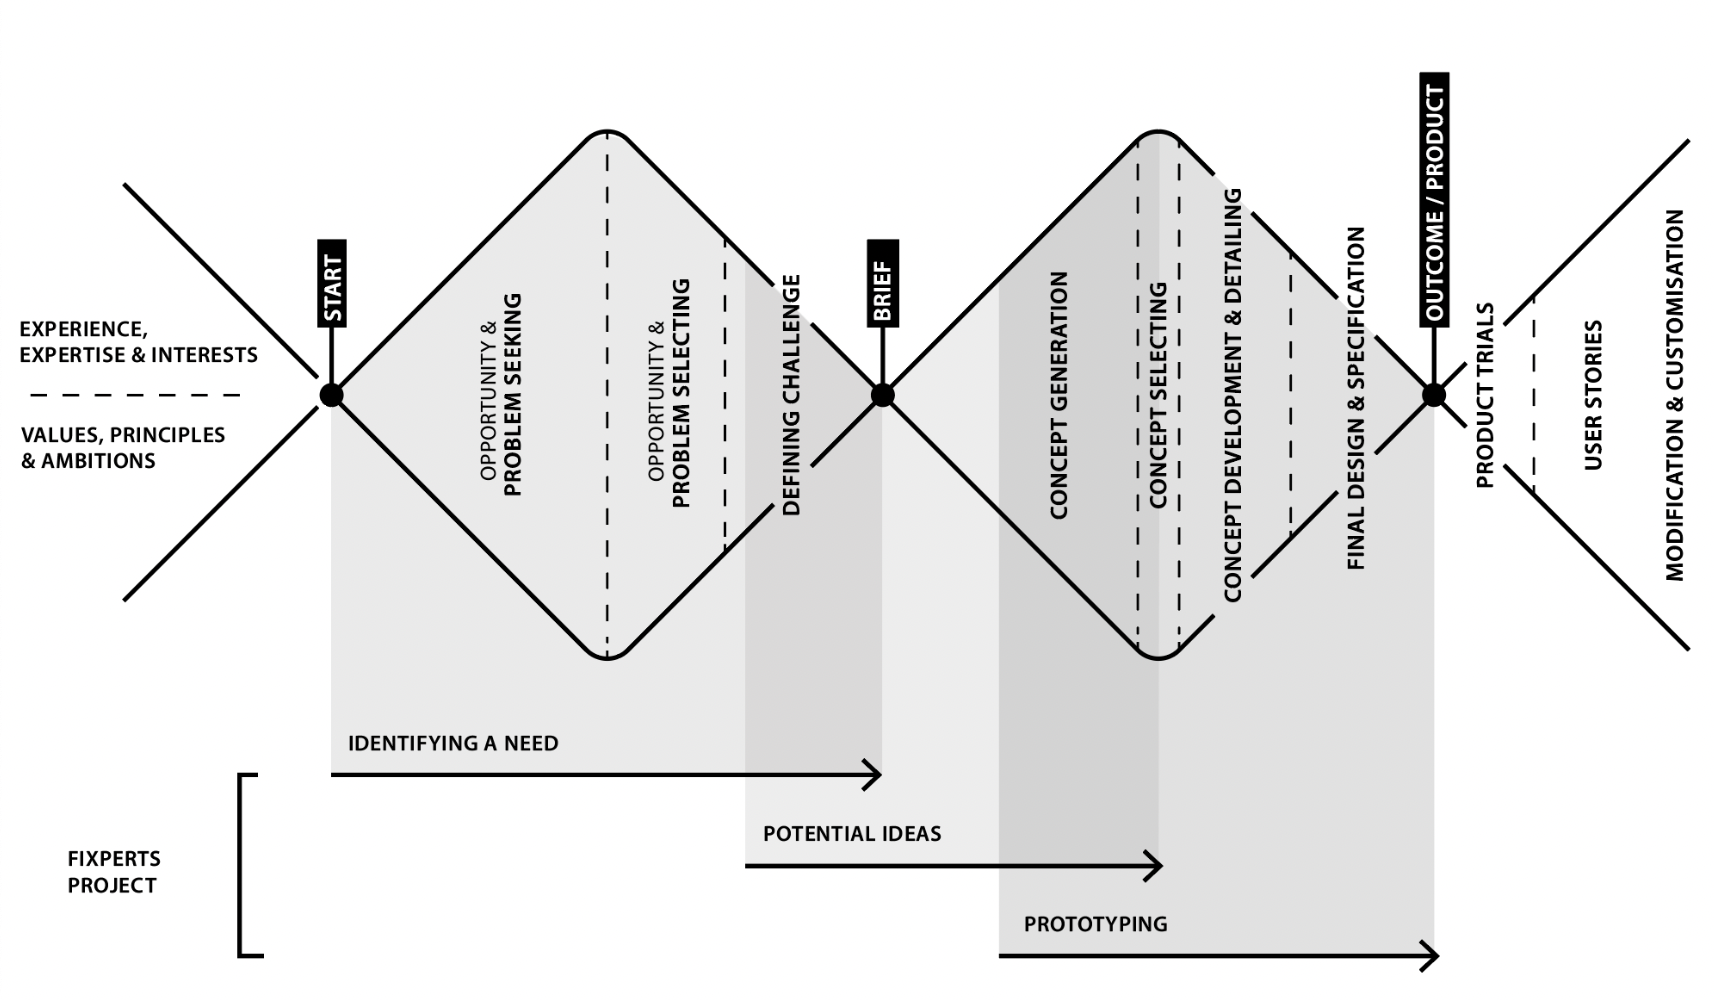
Broadly, it emphasises that the process of design is not linear - it requires constant feedback and revisiting our assumptions at each stage. Throughout the programme, we found ourselves returning back to this diagram to provide process guidance for our projects.
I found the concept of testing assumptions instead of testing the product particularly interesting. Working in tax technology I am familiar with software user testing - we test thoroughly and constantly at each MVP sprint. However, testing assumptions takes place much earlier in this process. It requires an inquisitive mind to keep asking the question - is it right?
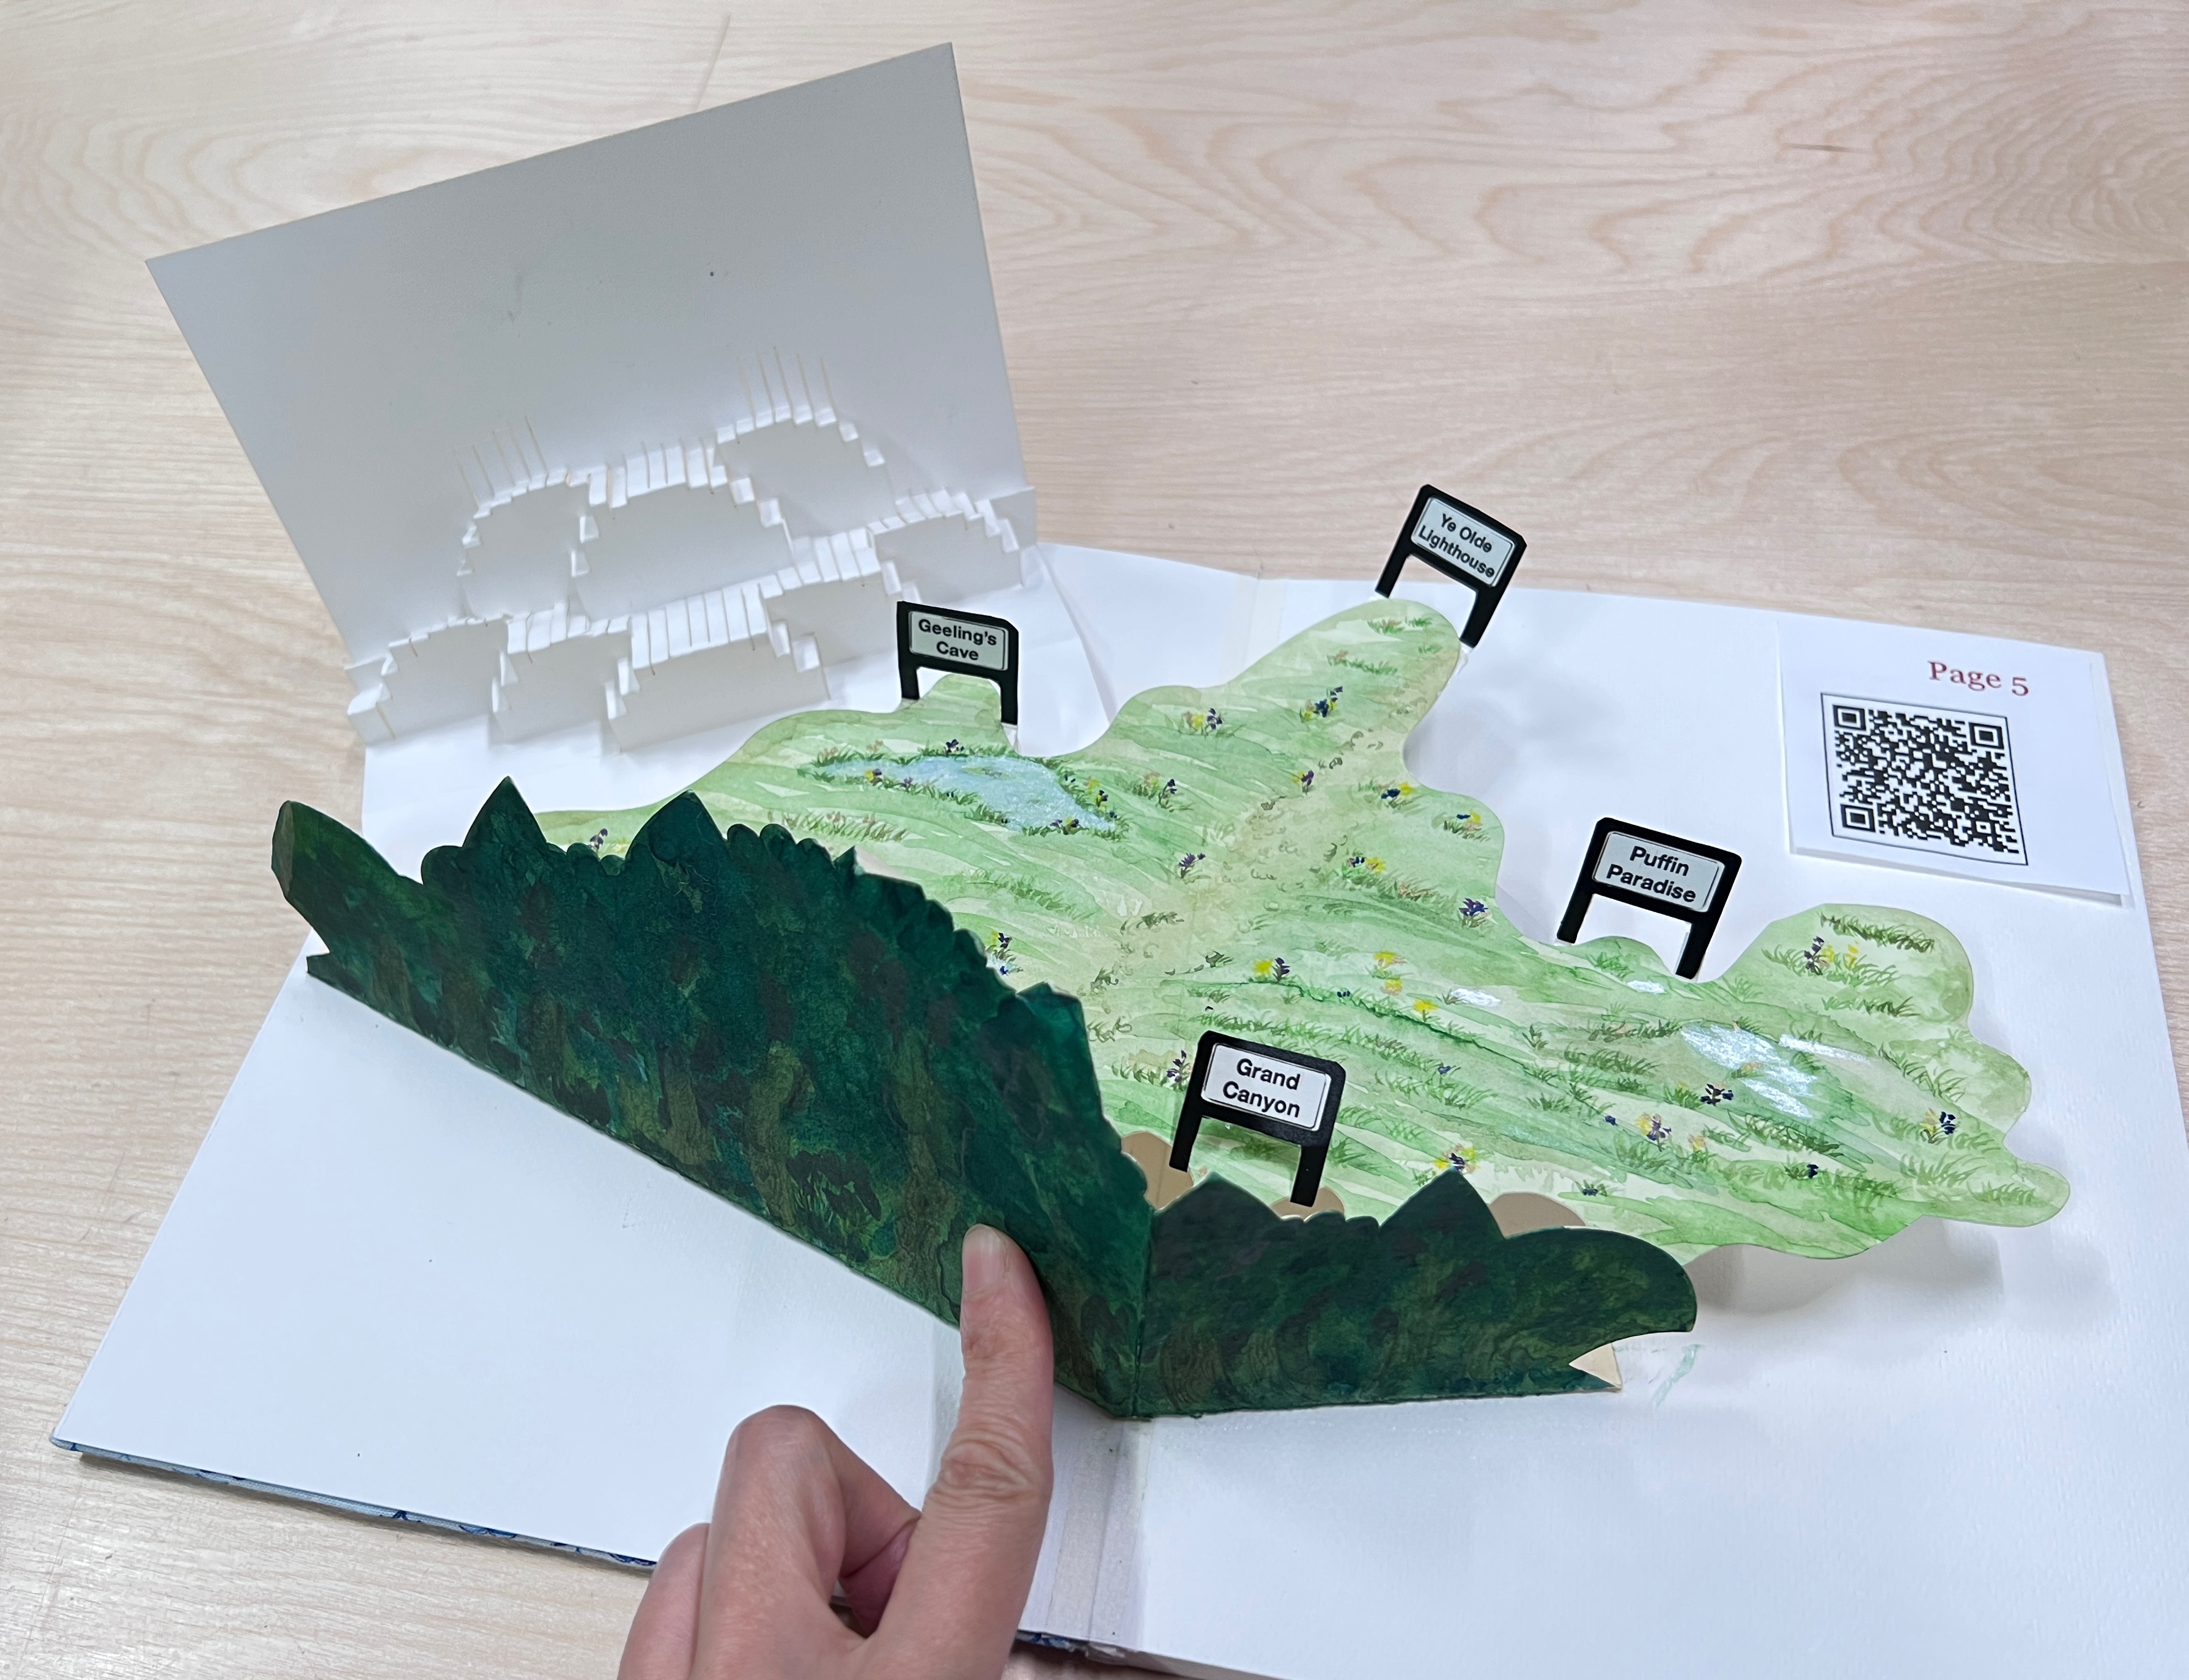
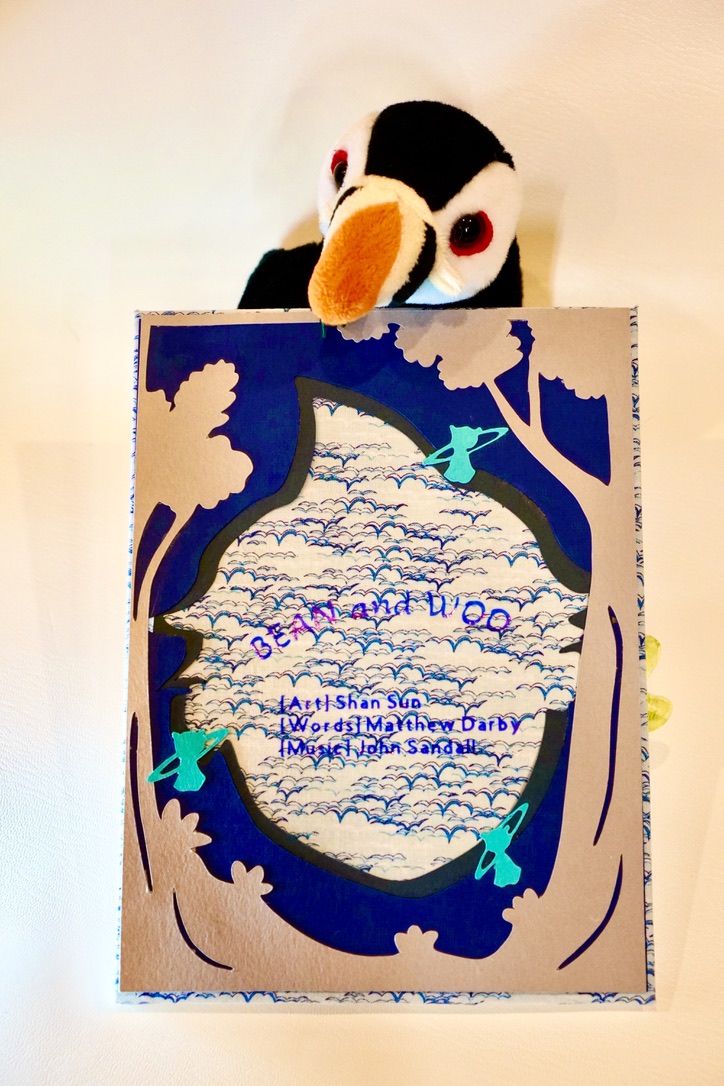
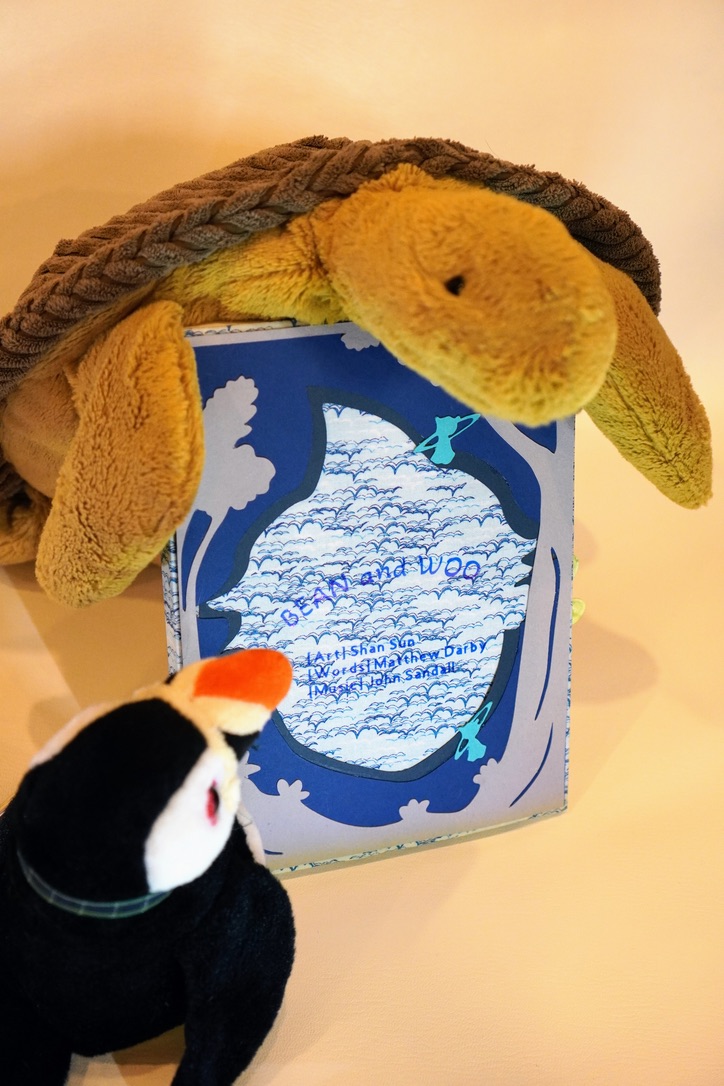
My chosen project is making an interactive adventure sound book for children, in the pre-school demographic aged between 4 and 6. It is a very ambitious project as it has multiple moving parts:
- artwork (2D illustration)
- pop-up paper architecture (3D modelling)
- sound module (electronics)
- game mechanism (interactivity)
- teaching element (mindfulness)
Before embarking on the fast prototyping journey, I started thinking of ways I could potentially test my assumptions. Naturally, my thoughts turned to data. I theorised ways I could acquire relevant data to test some of my initial assumptions, from book size and page counts, to materials and music clip length. With the help of a friend, we pulled data from various APIs (Kickstarter, Goodreads etc.) and available data (Amazon) to come up with ideas on the specifics of prototyping.
Needless to say, the benefit of this session didn’t come up until much later. But the idea of testing assumptions and revisiting the design process stopping points has stuck with me from the start and proven vital to the development process.
Week 2 - Digital Fabrication
This week we worked on digital fabrication using the laser cutter. The machines at Plus X are from Trotec. A favourite of mine is the smaller size Trotec Speedy 300, which cuts as well as engraves a variety of materials.

The fabricator takes vector graphics data as input, so learned how to use Adobe Illustrator to create SVG files. To test waters, I tried it on acrylic, wood, and leather in turn and made some small items of jewellry.
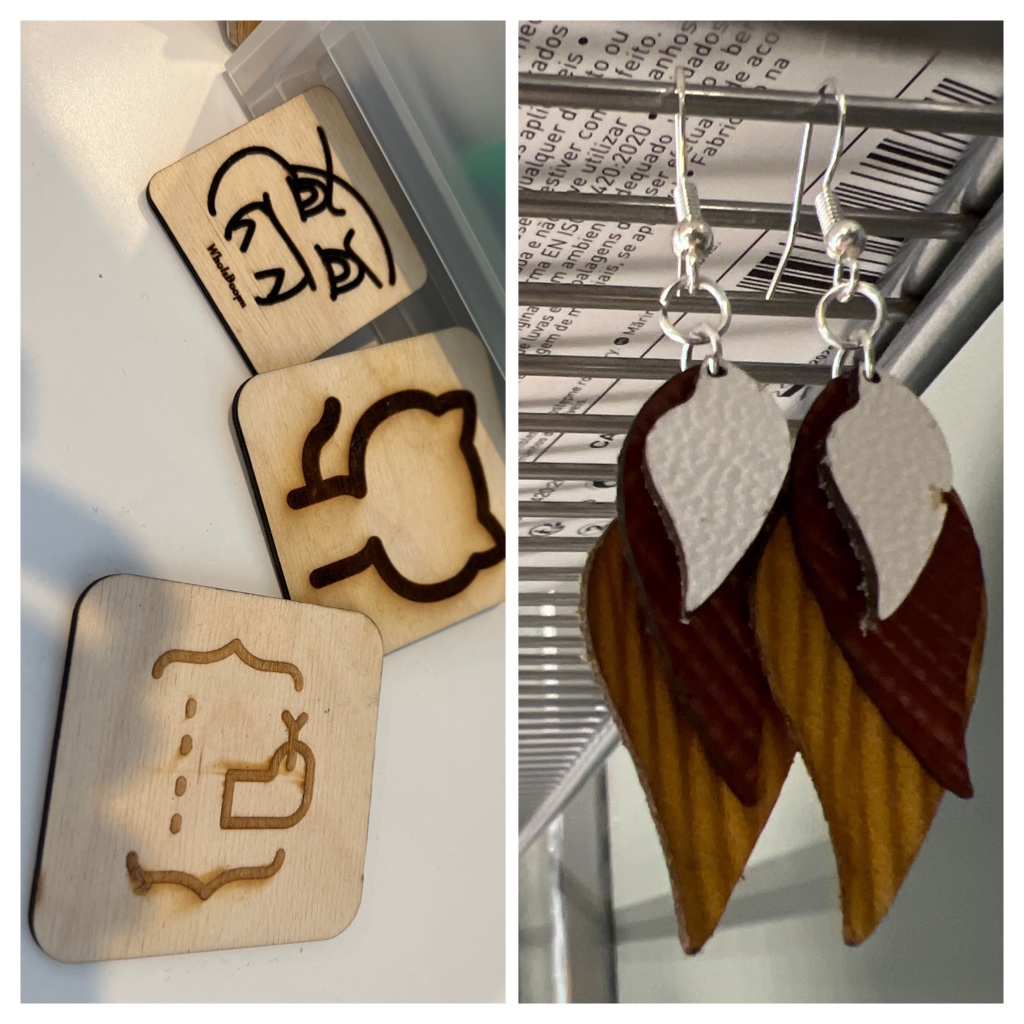
Next, I started to apply laser cutting to my project. To make pop-up art with a professional finish, the cuts and folds need to be very precise and clean. A laser cutter is the perfect tool for this task. For folds, I tried out light engraving in lieu of scoring. After many attempts, I was able to produce a satisfactory result. I still need to be mindful of the burn marks that the cutter leaves on paper, but those are easily covered up with paintings.
I also took an interest in looking through the material catalogue and books in the workshop’s library. As part of the prototyping process, we need to assess the results of using different materials. In my case, I noted the interactive book is designed for small children who are prone to tearing paper apart. It also makes sense to use rounded corners on pages to avoid hurting small hands.
For every material, there is a data sheet detailing all information relevant to it. Sometimes, I may have special requirements on the semi-finished product, requiring specific tests. For example, for the connectors I might use for the paper or electronic components (be it glue or small metal nails), I tried out the stress-test machine to evaluate the amount of pulling forces the connected parts could bear before they broke. The machine we have in the lab also produces a live data graph to show how the connected components behave under pressure, as well as the corresponding break points. This is important for toys/books made for small children to avoid creating choking hazards from broken components.
Of course, there are also third party suppliers like the Batchworks who would do all this work for us, and conduct testing as specified in their labs. While using a third-party supplier is what a business working at scale would do, I nonetheless found it very useful to at least have some awareness of it.
Week 3 - Introduction to Testing
This week, we had an external design consulting firm, Magnetic, give a guest lecture on user and assumptions testing. We dived back into the design thinking and double diagram theory we learned back in week 1. This time we drilled down on the “experiment” stage.
Working in tax technology, I am not unfamiliar with user testing for software. Nonetheless, this session went deep on the concept of product testing by focusing on the key element of innovation: uncertainty. It means the testing is not on the final product, but on the assumptions to address the element of uncertainty in innovation.
To embrace uncertainty, we need to understand the limits of our knowledge before determining what must be true. With this information, we can then determine the smallest idea we can break down, which we then use to work out whether the innovation is worth pursuing. The ultimate goal of this exercise is to turn uncertainty into confidence with evidence.
To try out this approaching of addressing uncertainty, we worked in pairs to fill in an “Assumption Canvas” for our respective projects. It was a very useful exercise for me to dig deeper into the project I scoped out initially, and really challenge myself on the assumptions I made. I particularly like the requirement of quantifying every test of the assumptions in the canvas, which allows me to carefully consider which metrics I should be using.
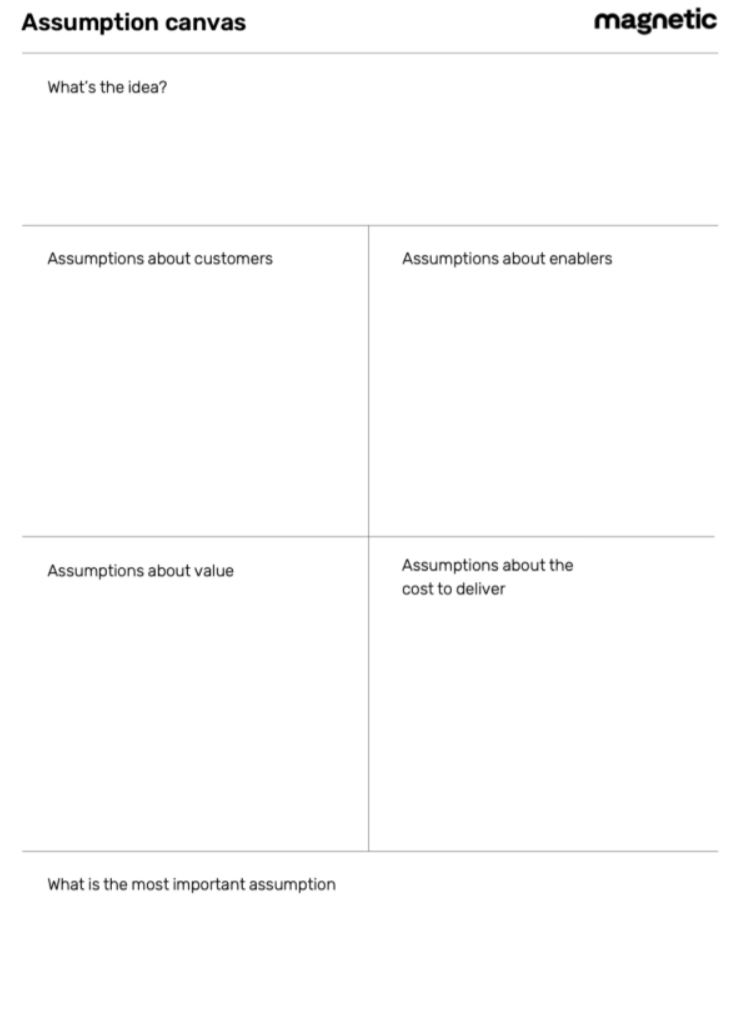
Going through this exercise made me realise that data analysis is a great way of testing assumptions. For physical products, another quick way of testing assumptions is using digital renderings on social media to solicit initial feedback. In both the physical and virtual worlds, inferential statistical methods such as A/B testing will be useful.
To be able to work with digital rendering, I also opted for the Keyshot session in week 6.
There was also a guest speaker who started his business by making small tube-shaped tissue boxes that fit in the drink holders in cars. I thought the story was both interesting and encouraging, and I learned to see that opportunity can arise anywhere.
The second half of the session focused more on the assumption testing based on what we filed in the morning. Broadly, there are four areas to test your assumptions**:**
- desirability: do the customers want it?
- viability: is the business model sustainable?
- feasibility: can it be done?
- integrity: will it harm the planet or its inhabitants (for example)?
We were taught that a good experiment should be designed for real customers. Its outcome should be measurable, and take the least effort to achieve the goal of the test. One suggestion that surprise me was that we should avoid using pre-existing elaborated survey data. Working in data science, we often rely on such data. But considering the advice, it makes sense: survey data for a physical product would require interactions in face-to-face meetings. In such a meeting, it is possible that people will be unwilling to tell what they really think. On the other hand, a software survey is conducted online, and is often anonymous. This can help the survey data be more robust.
There are also four experiment archetypes:
- concierge - co-create (for testing idea)
- wizard of oz - customer thinks the services exist (for testing viability)
- fake door - present benefits to test intent (for testing desirability)
- pop up - small scale MVP (for testing in person feedback)
At this stage of my project, my assumption testing is still focused on online data gathering and research. I’ve also made a note on speaking to targeted parents on small assumptions, suhc as character design and types of music. As I progress with my project, I will be testing more assumptions using what I learned this week.
Week 4 - Tear Down and Fast Prototypes
This week we focused heavily on fabrication. As part of the fast prototyping process, we will need to produce a ’looks-like’ model, whether it is a 3D rendering or an actual physical model. Specifically, I’ve worked a lot on these three areas for my project:
- product tear-down
- 3D printing (FDM and resin)
- electronics mock-up
Product tear-down is a method of opening up existing product in the market to gain insight into how it was made. I’m most interested in the latest technology in sound books for children, so I researched through Amazon’s listing and picked three sound books with distinct features:
- The Gruffalo (one sound board at the bottom of the book, interact with hard pressing)
- Frozen (a whole sound unit on the right hand side of the book, interact with button pressing)
- Garden Sounds (sound unit at the bottom of the book, sound sensors are embedded through out the book, interact with light pressing)
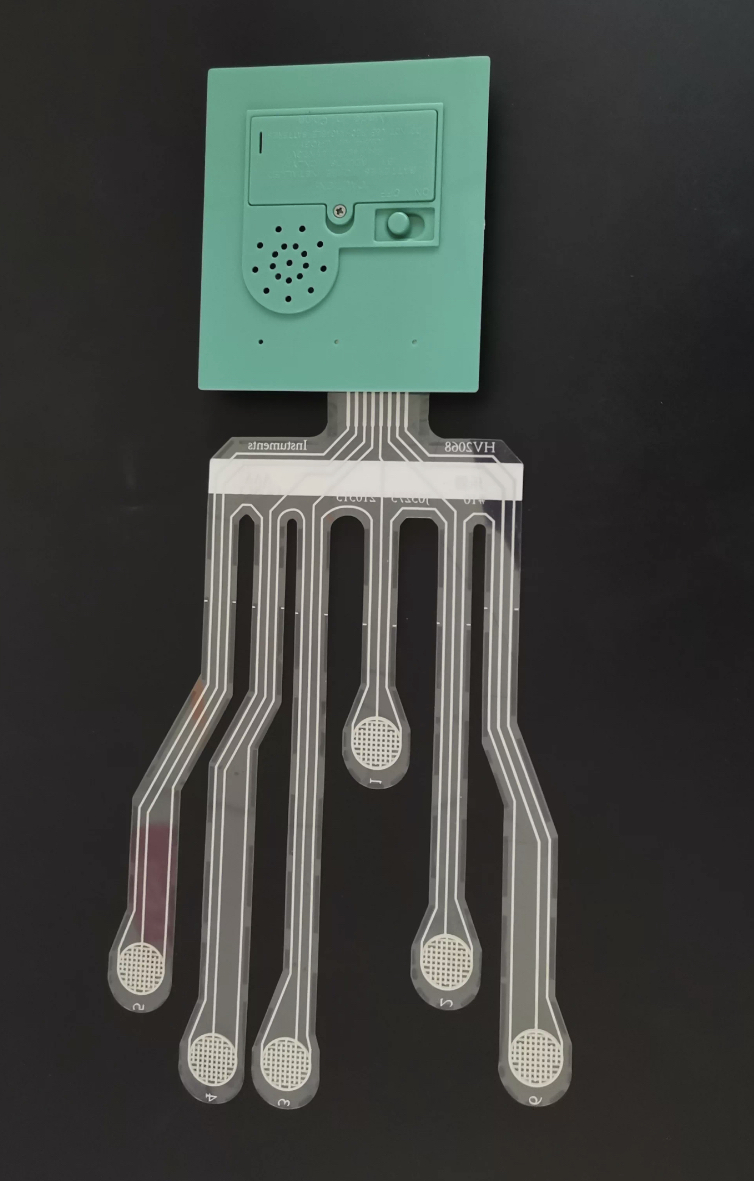
After trying out how each book worked, I decided to focus my effort on ‘Sound in the Garden’. This book, published by Osborne, provides the best sound quality and immersive reader experience. I opened up the books and found the electronic sound book unit at the back.
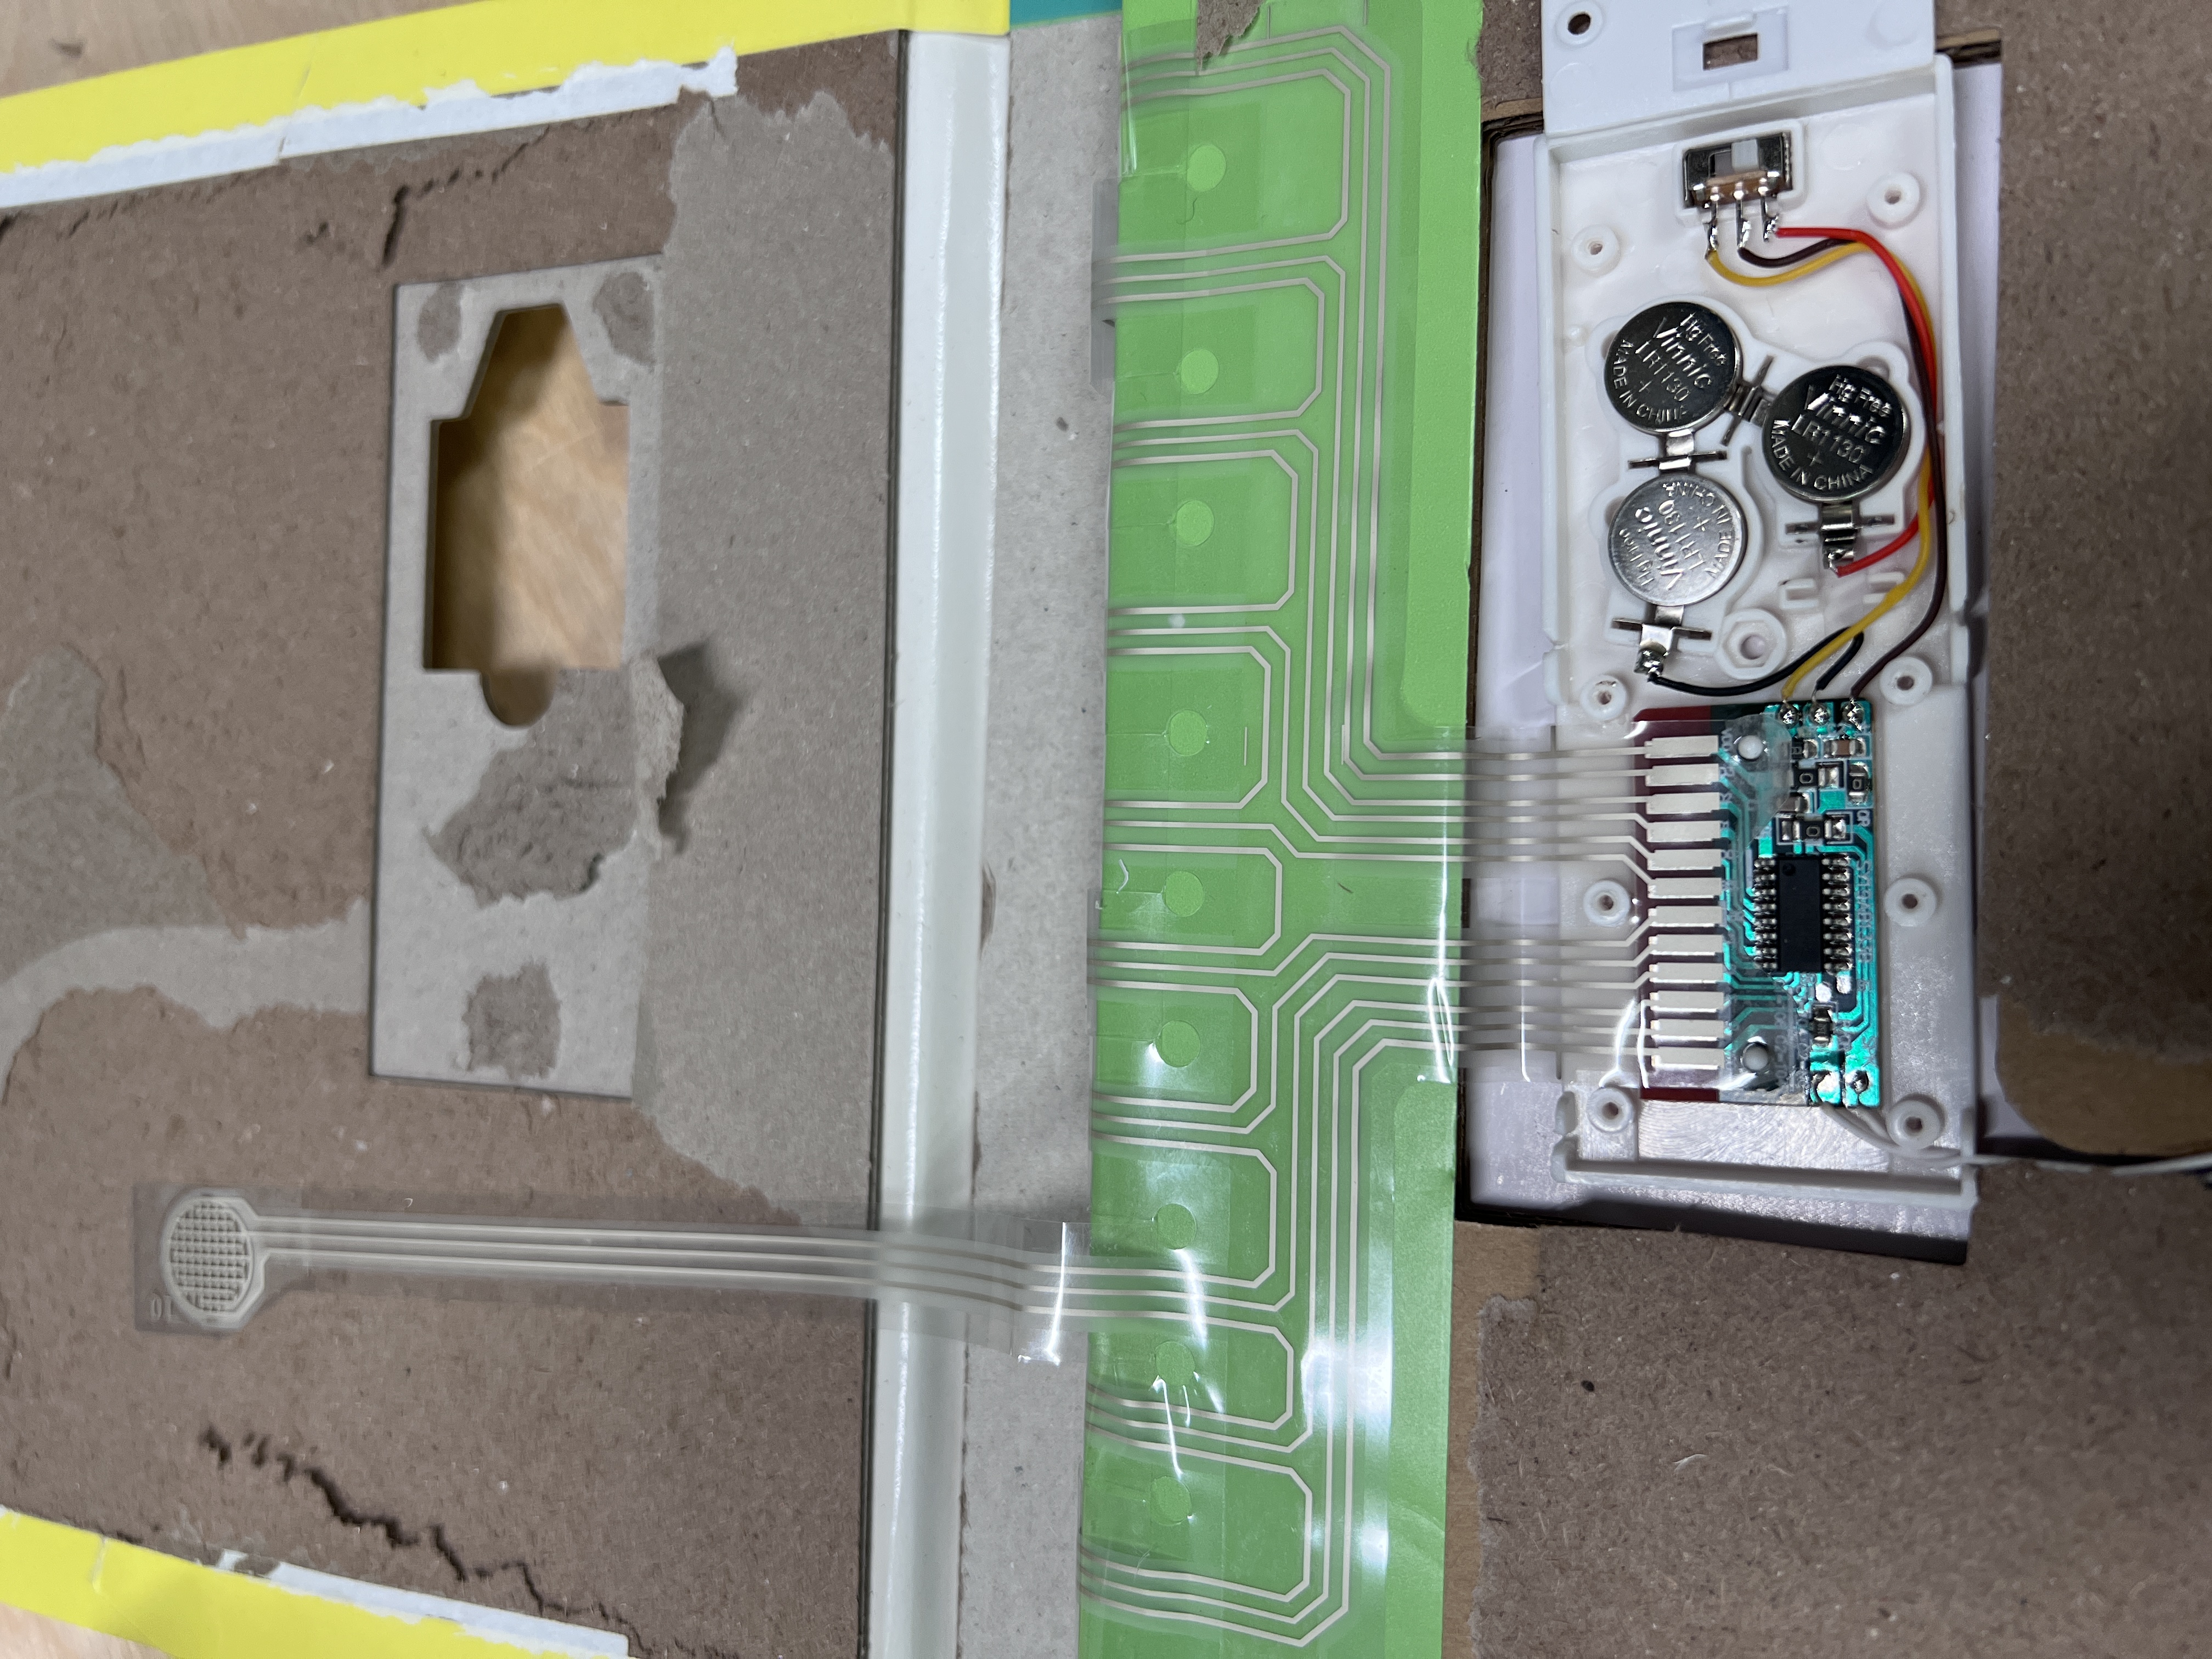
I decided to create my own sound-playing unit using common electronic components available to enthusiasts. Throughout this process, I discovered the Electronic Magnetic Field festival, which many industry experts would attend and generously teach newbies the basics of electronics. My first attempt was to create a sound-playing unit using Adafruit’s Arduino Mini FX sound board and amplifier. I also incorporated touch sensors into the prototype.
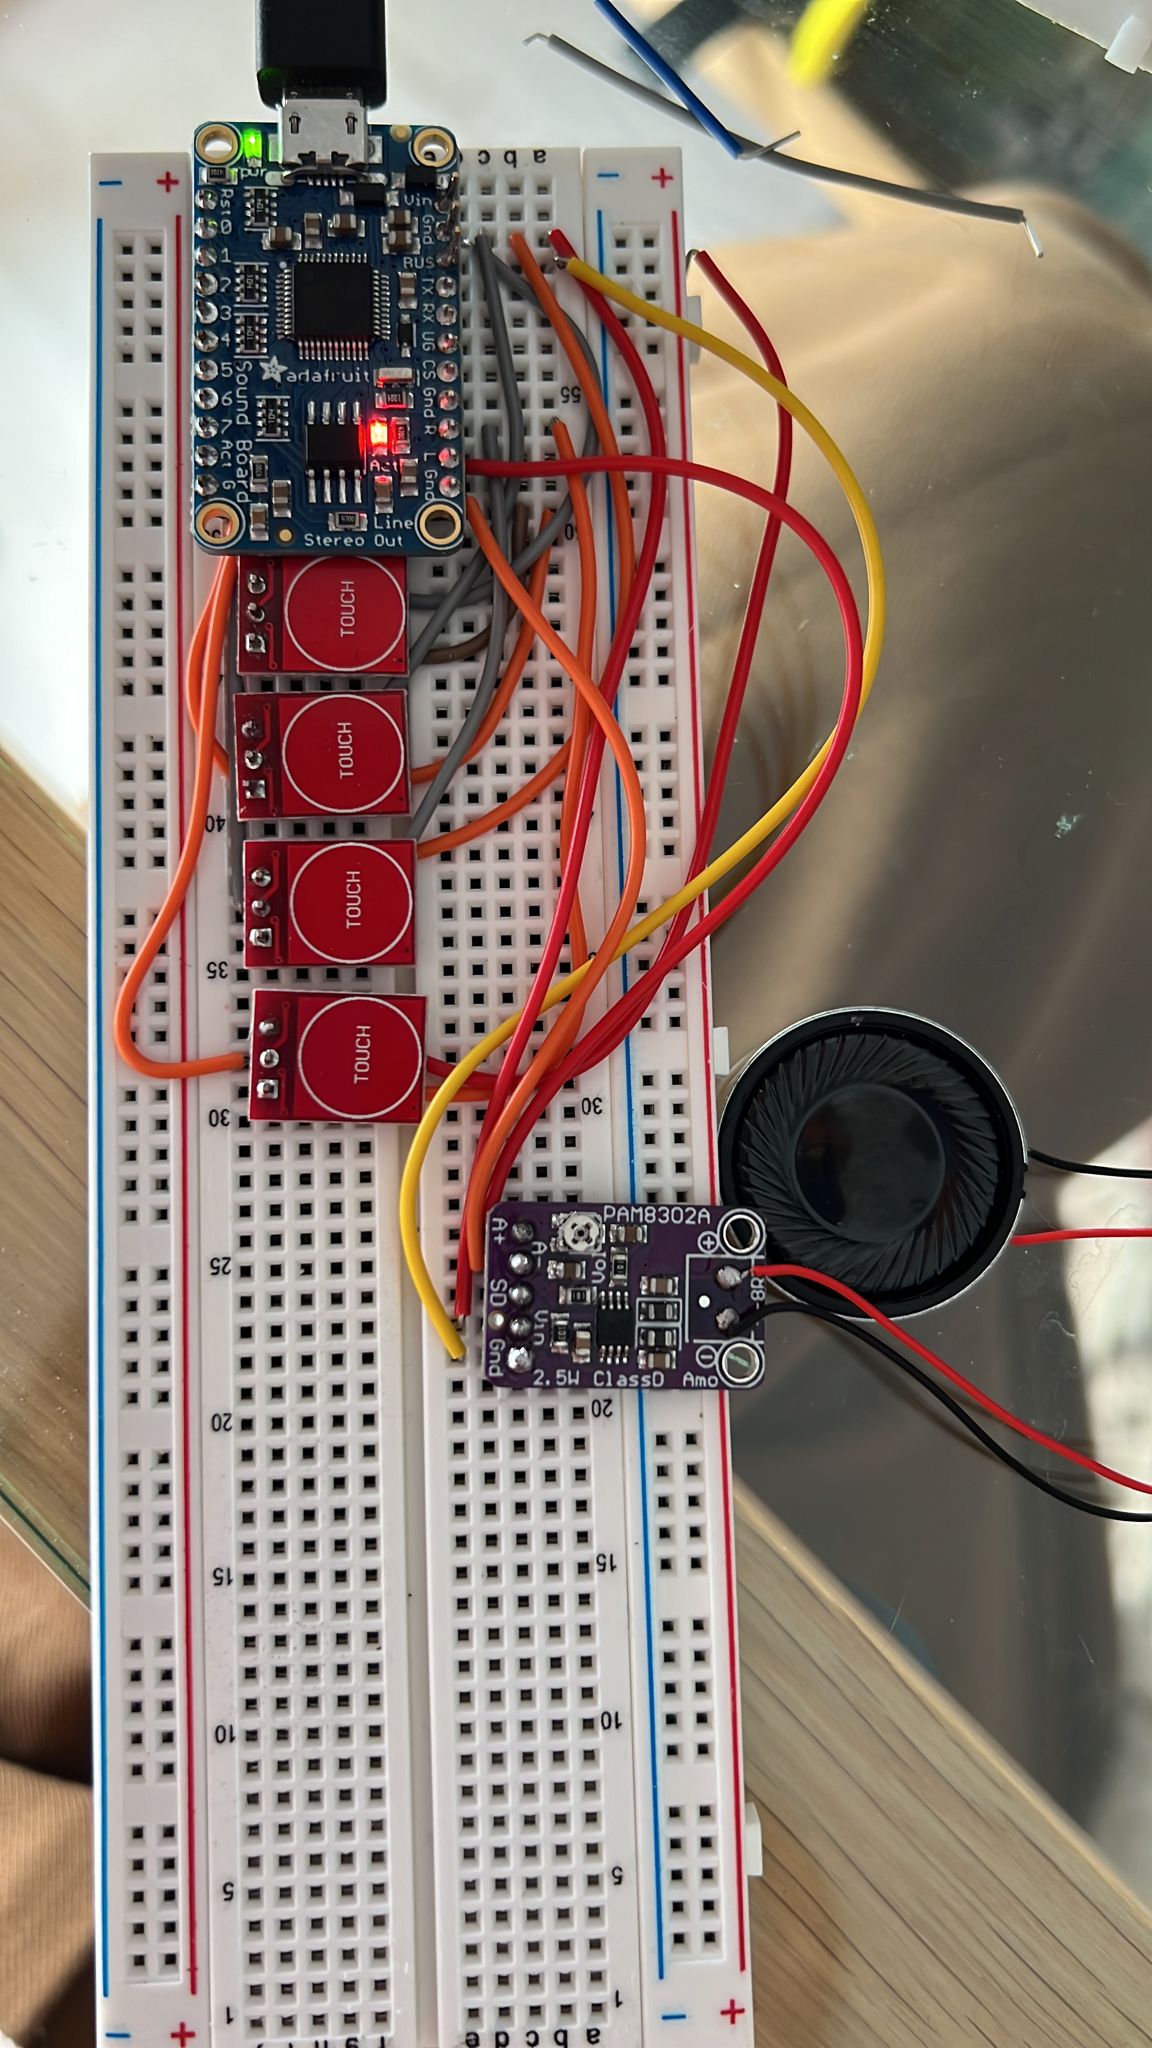
After many failed attempts, the final version of this prototype sound unit worked out well! But clearly, it can’t be be used in production. I am, however, very glad that I learned the basics of electronics through making this unit. I can now narrow down my requirement for a sound unit to the following main components:
- Micro-controller
- Decoder
- Amplifier
- Power supply
- Touch sensors
As a part of the fast prototyping process, this unit will suffice as a demo for the “looks-like” product. The remaining part of my week was spent on 3D printing. I already had some prior experience in using both the FDM (Fused Deposition Model) printer and the SLA (Stereolithography) or resin printer. Although I followed some hands-on tutorial online for using 3D design CAD software (such as Fusion360), I know I need to further improve my skill in this area.
Week 5 - Design for Manufacturing and Assembly
This week’s topic was Design for Manufacturing and Assembly (DFMA). Two experts in the field gave us talks on both the theory and their experience in the industry. This is interesting as it is often ignored during the initial product design phase. People tend to start with an overly ambitious designs or even prototype without considering the implications for the manufacturing process, e.g. materials availabilities, capabilities of suppliers, lead time, costing, reliabilities etc. It’s surprisingly relevant for tax technology projects I work, even though the focus was on physical manufacturing. Failure to take into account potential blockers from the initial design stage is likely to result in unexpected costing, compromises on quality and/or timing, and wasted efforts down the road.
I was also intrigued in hearing the experts’ recommendation in dealing with overseas suppliers and manufacturers, including:
- establishing long-term relationship by building trust
- avoid overwhelming suppliers or partners from the start
- steadily but increasingly building up knowledge of each other
- providing clear documentation and technical drawings, so clear measurements exist to rely on for testing
All of the suggestions are very applicable not only in physical product design, but also in digital product design such as tax technology.
Following the tear-down, I did further research into the unit used in Sounds in the Garden and found a Chinese supplier who is able to supply the membrane sensors and pre-recorded audio unit together. Individual unit prices including factory recording pre-recorded sounds are between $0.99 to $1.32. However, the minimum order is 1000 units. Ordering a sample will cost $80 per unit and another $100 to ship, with a lead time of 45 days. As a result, I was unable to fit in the membrane sound unit as I was hoping for. However, I did indeed gain real insight on the DFMA issues businesses are facing!
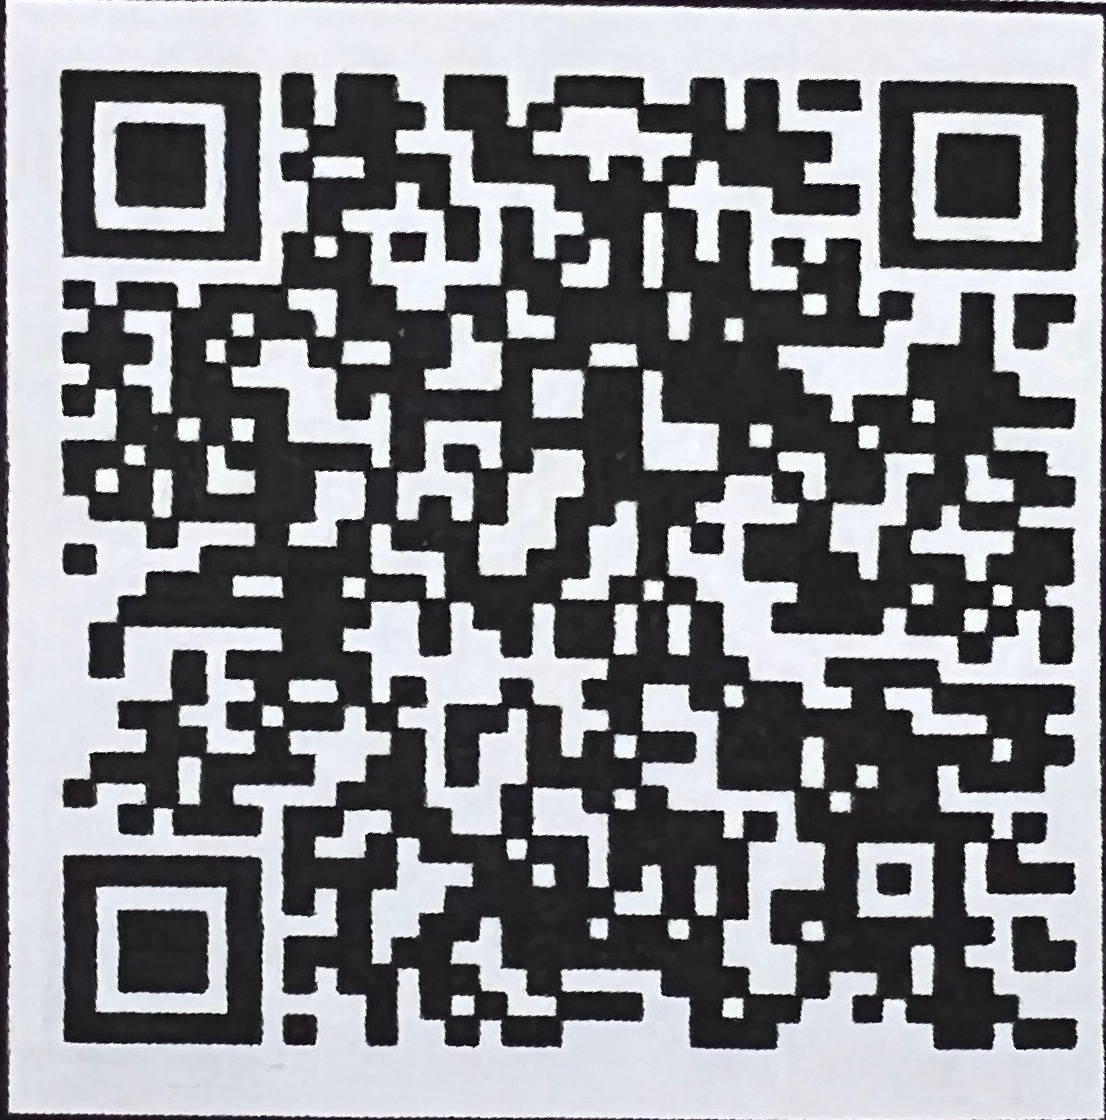
As I couldn’t source even the sample sound unit, we used an alternative method to store music online: we uploaded the music to a cloud provider, and created QR codes linking to each individual piece. We placed the QR codes in in the sample book, so people can listen to the music by scanning the image with their phone.
Week 6 and 7 - Presentation, Rendering and Photography
This week marked the last lecture week. We had a choice between learning product rendering or product photography. Having already done some research into product photography, I chose to take the session on using Keyshot for product rendering.
Rendering is a relatively economic way of fast prototyping and testing user reactions for a product. Many product photos we see online are rendered by software. Keyshot is a straightforward tool. With my previous experience of making games in Unity, it didn’t take long for me to get a hang of the tool after the practice session we had with it.
In the afternoon, we had the final presentation to some sponsors and stakeholders for the course. I worked extremely hard towards this date. I was very proud to be able to present a mock sample book, a working prototype of the electronic module, tailored music clips, and some attempts on the popup art. The presentation is here:
I also managed to squeeze in a few ’looks-like’ product photos. Time-limitations meant I wasn’t able to take advantage of natural lighting for the photos, but otherwise I still have a lot to learn in this area.
The audience asked many questions after my presentation. One interesting area they touched on was the two methods for playing the accompany music: using physical touch buttons versus scanning QR codes. Opinions were divided. I envisaged the book could be used for bed-time story reading, when parents may not necessarily want to take a phone to their child’s room. It is, however, undeniable that it is a more convenient and cheaper alternative to including a physical audio unit. My only conclusion is this choice would ultimately come down to controlled testing and more user research. This is an example where my past experience in software product development becomes useful.
I have come a long way from being a complete newbie to product design and digital fabrication. I had a lot of fun going through this course and seeing a physical product go from concept to realisation. It allows me to see the world through a different lens from what I am used to.
The course also helped me fill in gaps on the theories and concepts in design thinking, which is very useful for my daily work in software product development in tax technology.
Overall, despite being a condensed short course, I did feel like I learned enough to ‘make almost anything’. I’m sure my journey will continue and I’m thrilled to discover more.